If you are having any issues enrolling your device, or connecting to the school network, please check the troubleshooting information below.
For further assistance you may contact the School IT Support team via email at
itsupport@fernygroveshs.eq.edu.au. Students who are at school may also visit the IT Helpdesk located in E Block before and after school, or during breaks. Students may also visit during class if they have permission from their teacher.
Local Administrator
For Windows and Apple Mac notebooks the students local account on the device must have administrator rights.
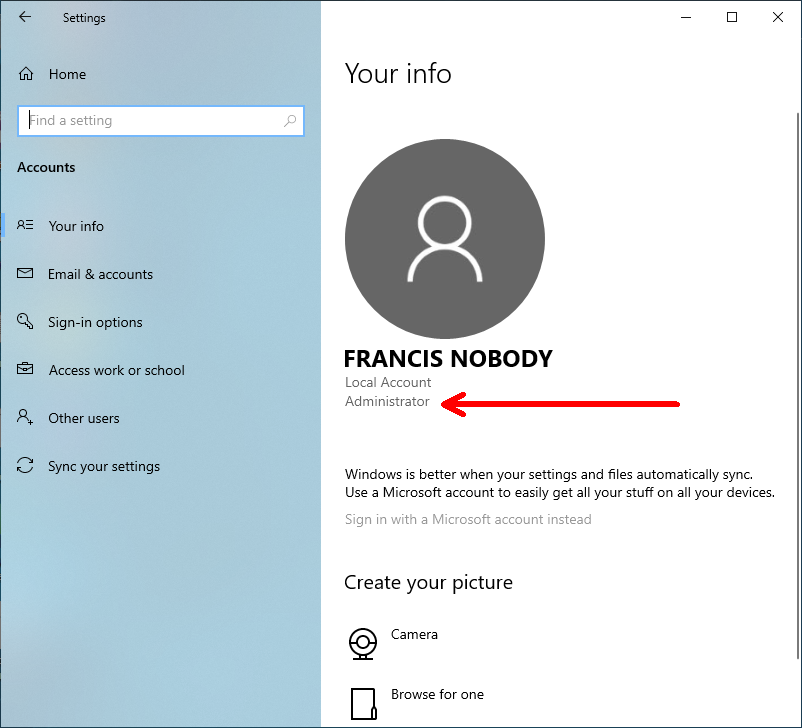
How to check if your account has Administrator rights (Windows)
- Open the Windows Start Menu. You can do this by clicking the button with the Windows logo in the bottom-left corner of your screen or you can use the key with the Windows logo on your keyboard.
- Then select 'Settings'. This is the button with the gear icon.
- Next, click 'Accounts'.
- In the 'Your Info' section you will see your account name and below should display 'Administrator'. This is confirmation that the account is set to administrator.
-
How to grant Administrator rights (Windows)
- Log onto the computer with an account that has administrator rights.
- Open the Windows Start Menu.
You can do this by clicking the button with the Windows logo in the bottom-left corner of your screen or you can press the key with the Windows logo on your keyboard. - Then select 'Settings', this is the button with the gear ⚙ icon.
- Next, click 'Accounts'.
- In the left-hand vertical menu select 'Other users'.
- On the right-hand side select the account the student normally uses to access the notebook.
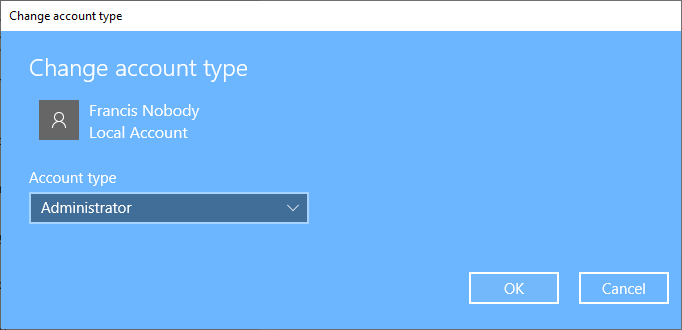
- There should be two buttons displayed, click the one that says 'Change account type'.
- On the next screen click on the 'Account type' drop-down menu and change it from 'Standard user' to 'Administrator' then click the OK button.
- You can now close the window and log out from the computer.
- When the student logs on with their account use the steps listed above to confirm their account has administrator rights.
Windows S Mode
Windows S Mode is often the default configuration set on a new laptop. Whilst it can provide some benefits, Windows S mode will prevent the laptop from joining the school and stops many school applications from being installed. The good news is that switching out of S mode is fairly quick and straightforward.
To use your personal computer on the school network the computer must NOT be in Windows S Mode.
How to Check if You Have Windows S Mode Enabled
To check if you have Windows S Mode enabled:
- Open the Windows Start Menu. You can do this by clicking the button with the Windows logo in the bottom-left corner of your screen or you can press the key with the Windows logo on your keyboard.
- Then select 'Settings', this is the button with the gear ⚙ icon.
- Next, click 'System'.
- Then scroll down the left sidebar and click 'About'.
- Check under Windows specifications to see if you have Windows S mode enabled. If 'S Mode' is displayed next to your version of Windows then you will need to switch out of Windows S mode.
How to Switch out of Windows S Mode
IMPORTANT: Switching out of S Mode is one-way process.
Refer to 'Switching out of S mode in Windows' (microsoft.com) or use the steps below:
- To switch out of S mode, click here to open the Microsoft Store to the Switch out of S mode (or similar) page.
On the Switch out of S mode (or similar) page, select the Get button. After you see a confirmation message on the page, you'll be able to install apps from outside of the Microsoft Store.
Accessing Resources at School
To access school resources, your device must be connected to the EQNET Wireless Network. School printers and network drives are not accessible from home.
Copying
Students may use the copy features of any copier around the school. Copy costs will be deducted from their available balance which is visible on the copier once signed in.
Students can sign in and commence copying by either:
- Tapping their ID Card on the card reader.
- OR Signing in with their MIS Username and password using the touch screen.
Printing
Option 1 (Preferred) - FollowMe printing via Papercut
- Install the BYOx Mapper App via the Company Portal
- Whilst at school you will need to run the BYO App to restore your connection to the printers.
- Once BYOx Mapper is installed, it can be run again at any time from the icon on your desktop.
Option 2 - Papercut Web Print
IMPORTANT: The following file types are supported.
Documents: pdf
Images: bmp, dib, gif, jfif, jif, jpe, jpeg, jpg, png, tif, tiff
NOTE: For Office documents (Word, Excel, etc.) students will need to save the document into PDF format prior to printing.
- While at school, open your web browser.
- Go to the Papercut server
http://eqgbn2148013:9191/.
(Optional: You may wish to bookmark this site)
- Log on using your school account credentials.
- Once logged on under the Summary section you will an available balance ($) for printing.
- From the left-hand vertical menu select Web Print.
- Click the Submit a Job button.
- Select the printer P2148FollowMe then press the Print Options and Account Selection button.
- On the next screen, enter the number of copies required, then press 3. Upload Documents button.
- Either drag the PDF document/s or image/s files to the web browser or click the Upload from computer button and select your files.
- Click the Upload & Complete button to print your job.
- Once you have finished printing you can log out of Papercut.
- Students log in via the touch screen, or tap their ID Card on the printer card reader to release their print job.
Network Drives (H: T: or X:)
- Install the BYO Mapper App via the Company Portal
- Whilst at school students will need to run the BYOx Mapper App to restore the connection to network drives.
- Once BYOx Mapper is installed, it can be run again at any time from the desktop icon.
Previous Page: 5. Websites and Software